
|
|
|
Subscribe to this site's News feed via RSS:
Our partners:
|
Cleaning DSLRs - the Dust Fight
David Burren Much has been written about cleaning digital cameras and dealing with dust (for example at CleaningDigitalCameras.com). But still many people think of it as a hard problem, and panic when they get some dust in their pictures. This really isn't necessary! Cameras such as the Olympus 4/3 DSLRs, the Konica-Minolta/Sony 7D/5D/A100, and the Canon EOS 400D do a good job of keeping dust off the sensor by vibrating the sensor filter but even without that technology, dust shouldn't be a major problem for any DSLR. Yes occasionally you will get dust into your camera and it may show up as spots when you take photos with small apertures, but removing the dust safely usually isn't hard.
I generally deal with cleaning through 3 stages:
Blowing
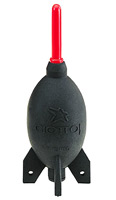
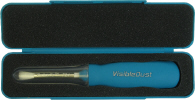
This is the simple step. Most dust is simply sitting on the glass filter in front of the sensor, and directing a gust of air at it will blow it away. However, it needs to be clean air. Not with droplets of propellant or oil from canned air, not with droplets of saliva. Just air. Luckily this isn't hard to achieve. The Air Rocket from Giottos is a very good blower, providing a very strong burst of air. If needed, it can even be taken apart and cleaned with a mild detergent (worthwhile doing as a precaution every year or so). Using the blower is simple: enable the camera's "sensor cleaning" or "mirror-lockup" mode (which will open the shutter and let you see the sensor filter), put the nozzle of the blower into the camera (but be careful to not touch anything!) and blow. While you're doing this, holding the camera upside-down will let gravity help take the dislodged dust particles away rather than re-settling onto the sensor. Take it slow and do it carefully, and pretty soon you'll think of it as easy and obvious. Most of the time with a blower like this, blowing dust off the sensor will remove almost all of it. Often you don't need to go any further! I keep an Air Rocket in my camera bag (in a zip-lock bag to keep out the dust) which lets me clean my cameras whenever I need to. I also tend to have Air Rockets available for participants of my workshops. BrushingOccasionally there may be stubborn dust that won't blow away. At this point you can decide to let someone else (e.g. your camera repair vendor) clean your camera for you, or you might decide to press on. The next level of cleaning I use is the Arctic Butterfly from Visible Dust. The Arctic Butterfly was recently updated to the "724" model (I currently have the older model, but it works in the same way).
The Visible Dust brushes are specially designed to not scratch the sensor glass, and are charged up with slight static electricity to attract the dust. A gentle swipe of the sensor is usually enough to pick up the dust (although dust that has become cemented to the glass via humidity can be too stubborn). The Arctic Butterly is a very simple and effective tool: a pair of AAA batteries and a tiny motor in the body of the brush serve to spin the brush head, both to dislodge dust collected from the sensor and to staticly charge the brush. Unlike the "wet clean" tools which are often not allowed on aircraft, the Arctic Butterfly is safe to fly with. Visible Dust provide instructions for cleaning the brush (again, mild detergent is the key) and doing this occasionally is a good idea. Of course, cleaning the cap that covers the brush at the same time is sensible. WipingThis is what most people think of as "cleaning the sensor". Using special lint-free pads, and a tiny amount of cleaning fluid (usually 100% methanol) the sensor glass is wiped clean. A lot of care is needed to make sure you don't scratch the glass, but it's not hard and does a good job. For further details have a look at CleaningDigitalCameras.com. If it still scares you, good camera repairers usually provide this cleaning as a service and you can pass the risk off to them. While some photographers clean their cameras with this method quite often, many photographers find that a good blower is enough and they only need this type of cleaning every couple of years. At that point it's often easier for them to pay a professional to do it. Of course, each of us uses our cameras in different ways and in different conditions: you'll have to find out what works for you. I use this wet-clean system (Eclipse and Pec-Pads) but it's not something I take into the field or on trips with me. The Air Rocket and Arctic Butterfly suffice (including on my 2006 East African trip: 2 weeks of being covered with dust in the back of a Land Rover). Taking test photosTesting for dust (a worthwhile step before heading out to take photos - especially if using small apertures such as in macro work) doesn't take long.
That's it.
Take the photo, transfer it to your computer, zoom in to 100%,
and any dust will be immediately noticeable.
There is one last step that's important: remember to set your camera back to normal settings! Now stop panicking about dust, get out there, and take your photos! | |||||||||||||||||||||||||||||||||||
|
Unless otherwise noted, all text and images on this website are Copyright David Burren Photography 2000-2010 and may not be used for any purpose without prior consent.
| ||||||||||||||||||||||||||||||||||||